Paul Doesn't Want A Console
(Updated: )
Consoles are lame, PC’s are great… except for when it comes to gaming on the TV or more specifically, not at your desk. Until now! This guide is for having the most console-like experience at the couch, while using the processing power of a more powerful desktop.
Quicklinks
Links to all the downloads in the article
- Parsec
- Automate (Play store)
- Automate Flo File
- Autogame
- Playnite
Parsec
Parsec acts like Remote Desktop, but on drugs. Rather than vector or badly compressed bitmap based transmission, Parsec essentially sends a video stream from host to client, capturing video feed from a lower level than RDP.
This results in considerably less latency, making a wonderful gaming experience and perfect for other productitivey things like video editing.
For our purposes, the free version is more than good enough.
- Download Parsec
- Install for all users if you want to be able to login, or just for yourself if you only want it to work once you’ve logged in the host. I’d recommend for all users if you’re going to be using Wake-On-Lan.
This installs it as a service, you won’t need to otherwise manually launch it.
Settings
Recommended settings
Parsec -> Settings -> Host
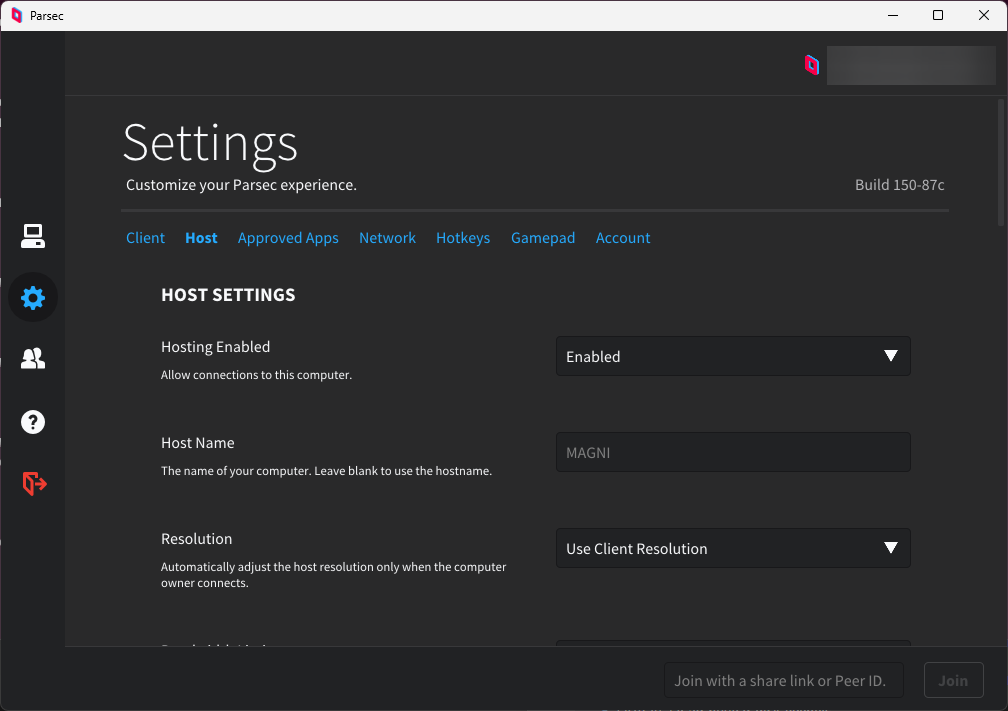
- Resolution: Use Client Resolution
- Bandwidth Limit: 50mbps (can always set the actual rate on the client, but only up to the max on the host)
- Fallback to Virtual Display: On (with this set to off, hosts monitor must be on)
- FPS: 60 unless going to a high refresh display
Using the advanced configuration file, you can set the audio bitrate up to 512kbps (up from 128kbps). You can access the config file by going to settings, scrolling to the bottom and clicking the link.
Add the line host_audio_bitrate = 512, save and restart Parsec on the host.
Notes
There are a few gotchas to be aware of
-
Xbox controllers connect to the client, and are supported natively via Parsec. Other controllers (PS4, etc) can work, but may require tinkering to get it to appear as an Xbox controller. No settings need to be touched to make this work out of the box, and it’ll work for multiple controllers at once.
-
Windows requires a mouse on the host otherwise it won’t render the mouse pointer at all. Not a Parsec issue. If its a wireless mouse with a non-bluetooth receiver, the receiver alone is enough to tell Windows its plugged in, mouse can be off.
-
Parsec cannot handle audio that is higher than 32bit/48khz. Unlike other software where mismatched sample rates will cause slower or faster pitched audio, Parsec just goes silent. Audio is probably Parsecs greatest weakness currently.
-
If you’re using a tiny PC like Lenovo’s M93p, you may need to grab machine specific drivers to get them to install properly. The key is to get the correct graphics driver, otherwise performance will be terrible. Even Intel’s HD4600 (found in the i5-4590T and other 4th gen chips) is capable of 1080p@60fps decoding in under 5ms latency. Running purely off the CPU will see that latency spike to well over 20fps.
At 60fps, every frame is displayed for 16.6ms. Latency at or below that number will mean no more than 1 frame of latency - completely imperceptible.
To that end, if its a M93p, install Lenovo System Update
WOL (Wake-On-Lan)
Wake On Lan (WOL) allows you to turn on your computer by sending a command from another device (such as your phone), even from the off state. When WOL works, it’s magical, but hard to track down when it doesn’t.
WOL requires the computer being woken up to be connected via ethernet, not wifi.
Many modern Wifi cards do support WOL over Wifi, but check your card/chipset for specifics.
In BIOS
Different brands and different models within the same brands will have different BIOS layouts and different labels for the settings, so it’s impossible to give an exact guide.
Typically in the power menu
- Disable ErP (“ErP Ready”).
- Enable: Wake On PCIe
- Enable: Wake On LAN
In Windows
Power Menu
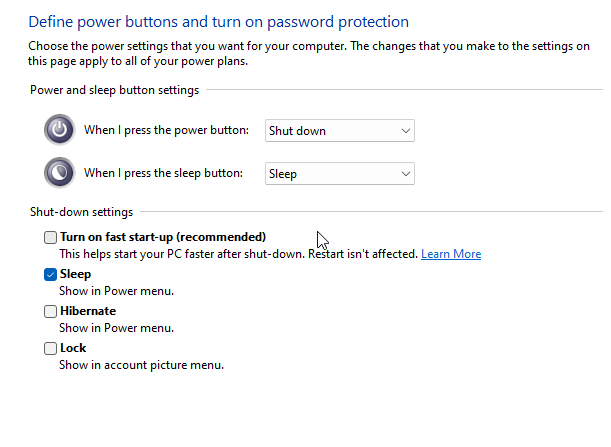
- Windows + R,
powercfg.cpl - “Choose What The Power Buttons Do”
- “Change settings that are currently unavailable”
- Untick ‘Turn on fast start-up’
Adapter Settings
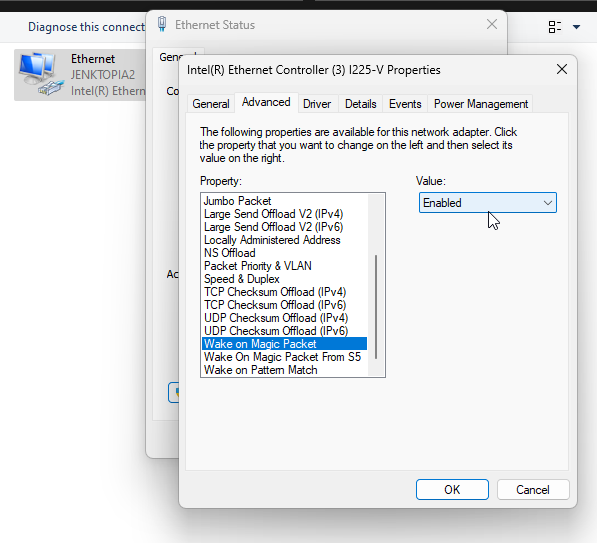
- Windows + R,
ncpa.cpl - Right click your ethernet adapter, Properties -> Configure
- Under Advanced, search for “Wake On Magic Packet” and “Wake On Magic Packet From S5”, make sure both are enabled. S5 is powered off.
- Under Power Management, see if you can tick those boxes. I can’t, but it still works.
WOL clients
Setting up WOL on the host computer is one thing, actually waking the computer requires some sort of software to trigger it. I use WolOn on Android. Setup is pretty straight forward, you just need the target computers MAC and to be on the same network (wifi is fine for the waking device)
In a command prompt,
ipconfig /all | find "Physical Address"
will find all MAC addresses, and it’ll most likely be the first one.
WOL with NFC
Once WOL is setup, the next step is to turn on one or more PC’s with NFC tags. This will allow you to boop your phone to a tag, and have your desktop and console launch at once. One caveat is your phone must be unlocked to read NFC tags - this is a (security) limitation of Android.
It’s hard to go past Automate, for free.
Automate works by creating “flows”, flows have triggers (such as connecting to a wifi network or in our case, reading a NFC tag), that will then trigger one or more events.
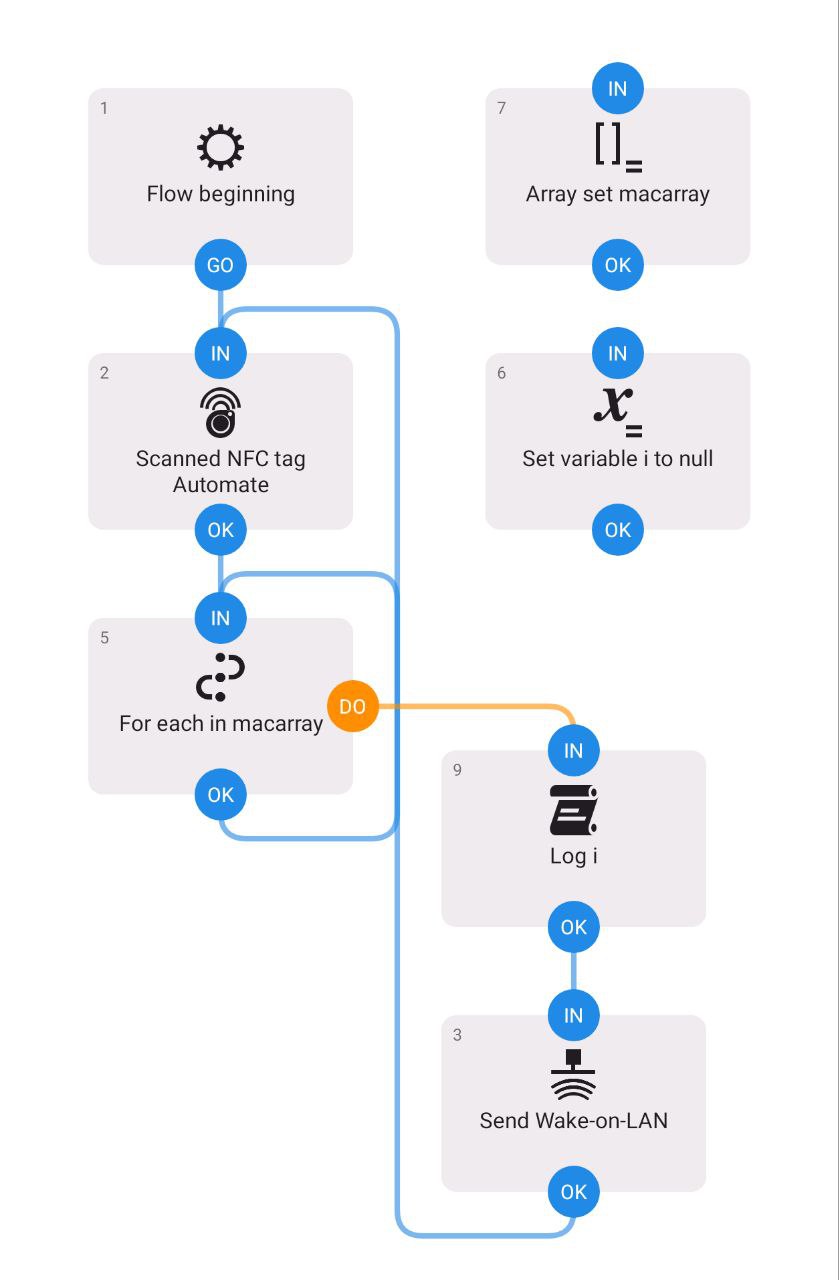
This is the “flow” that I use. You can download it here. If Automate is installed, it should prompt to import it. Do so, and open up the flow.
The loop turns the data read in from the NFC tag into an array, and iterates over the addresses in that array and sends a WOL packet to each address.
This requires a particular format to be written to the NFC tag, ["mac1", "mac2", "mac3"]
A complete example is ["00:15:5D:60:B9:14","00:11:22:33:44:55"]
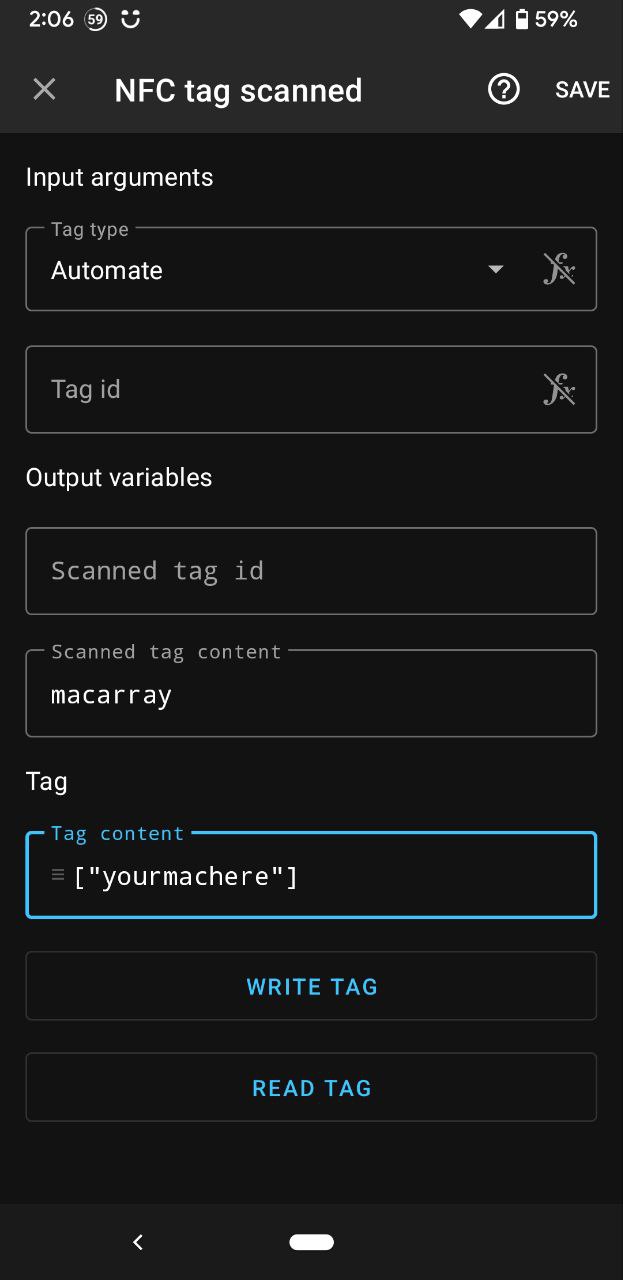
You can use this particular script to write to NFC tags too - tap the ‘Scanned NFC Tag’ block, and edit the “your mac here” field down the bottom. Press “Write Tag” and hover over the NFC tag you wish to write to.
Once you’re happy with the script, back out of the editor, and hit start. Go into settings, tick “Run on system startup”
Playnite
Playnite is a front end for other game libraries like Steam, Epic, Origin, GOG, Battle.net, Ubisoft Connect. Install those launchers/install your games, then setup playnite. It’ll pull down the data, find what you’ve got installed, etc.
Playnite Fullscreen is great for hitting play, but the general management (installing of games, getting all the metadata etc) should be done at a desktop
Autogame
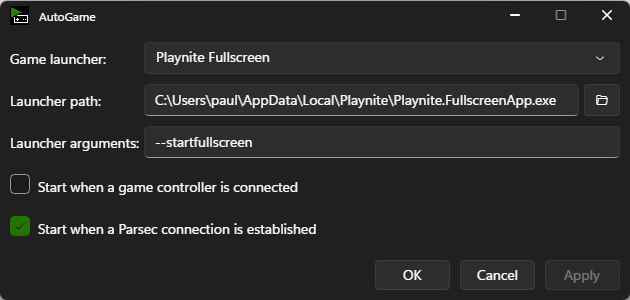
Autogame launches Playnite (or other game launches like Steam Big Picture) in full screen when it detects a Parsec connection.
Has two options, “start when a game controller is connected” and “start when a parsec connection is established”. I believe its an ‘or’ condition rather than an ‘and’ condition, so I’d opt for just the latter.
Be aware that it cannot detect the difference between an incoming and outgoing Parsec connection.
On The Client PC..
To get the Parsec client to popup on launch, Windows + R, shell:startup, copy/move the Parsec shortcut into that folder